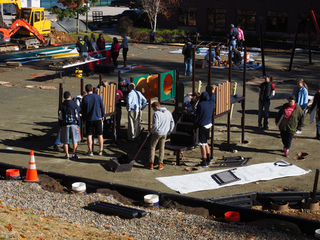
Columbus Day weekend found several EOS Ceramics and Jewelry Students and alumni at the Mansfield Community Playground Build. Max, Olivia, Nicole, Julia and myself were among the volunteers who served food, ran childcare and helped build at the event. It was an exciting culmination to 4 years of fundraising efforts in which EOS students raised more than $1500 in Pizza Taste Offs, Art Sales, Robot-a-thons and Tile Making events. The playground is awaiting the curing of the rubberized surfacing, and will have a formal 'opening' on October 31st behind the Mansfield Community Center.
Jewelry II students are pleased to announce a department wide upper level show at Starbucks in November. We will be hanging on November 5th. Please stop by and check out the exhibit Nov 6-30, 2015! Jewelry II also profiled a technique of their choice and shared their learning with classmates this week. Check out Max's post on scoring and fold forming.
Jewelry I students worked on rings this week, and came up with some creative variations on twists. We also started a texture band, in which we experienced first hand the properties of work hardening and re-crystallization in metal. The metal structure becomes increasingly fractured when it is bent, twisted or hammered, eventually breaking. This process is known as 'work hardening'. Students experienced this by using a hammer to peen round stock into rectangular stock, then they re-heated the metal through the colors of heat (white and crusty, black, purple, red) to re-grow the metal structure, creating a soft and flexible stock for texturing. Put in your ring 'special orders' and give your child your ring size:).
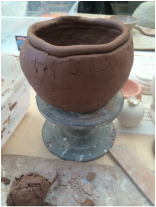
Ceramics I students worked on udu drums this week. We rolled, and rolled and rolled to create even thickness coils to build our drums. We compared our drawings to the actual clay starts to determine if we were dealing with a sphere, squished or tall sphere or an egg shape, and then figured out if we were on track with our construction with math estimation. We measured the width and height of our formal sketch's drum belly, then measured the width of our actual drum belly. We used the measurements to create a proportion Hpicture/Wpicture=Hdrum/Wdrum. We then inserted our 'knowns' to figure out how tall the belly of our drum should be and adjusted accordingly using v cuts, pinch, or by removing coil layers to get the students actual drum to match the drawings they created.
 RSS Feed
